本指南详细介绍了如何使用 Hardhat 在 Berachain Artio 测试网上部署 ERC-721 智能合约,并对其进行验证。内容涵盖了环境配置、智能合约开发及验证的各个步骤,并提供了获取更多支持和资源的途径。


Berachain Artio 测试网介绍
在如今超过100个区块链技术蓬勃发展的世界中,Berachain 凭借其基于 Cosmos 的 EVM 兼容链,成为开发者构建应用的首选。Berachain 以其 POL 设计、强大的可扩展性和增强的安全性而闻名,为开发者提供了一个理想的环境,同时也对用户具有吸引力,鼓励他们与链进行交互。其对去中心化应用(dApps)的早期采用以及 EVM 兼容性,使其成为开发者构建和测试产品的理想平台。
与其他区块链一样,Artio 测试网是即将推出的 Berachain 主网的关键组成部分,为开发者提供了提前准备和测试工具的试验场。在这里,智能合约的“熊魔法”,尤其是 ERC-721 标准的不可替代代币(NFT)得以实现。 🐻 ❤️
🤔 为什么选择 Hardhat
Hardhat 是以太坊开发中的重要工具。它简化了编译、部署、测试和调试智能合约等各种流程。你可以将其视为个人的区块链工作坊,配备了所有开发去中心化应用所需的工具。
Hardhat 是以太坊开发中的重要工具。它简化了编译、部署、测试和调试智能合约等各种流程。你可以将其视为个人的区块链工作坊,配备了所有开发去中心化应用所需的工具。
🛠️ 我们在构建什么?
在本教程中,我们将通过使用 hardhat-ethers 在 Berachain 测试网(Artio)上创建并部署 ERC-721 智能合约,向您展示整个过程。本教程将重点介绍如何编写、部署以及验证使用 Hardhat 和 ethers.js 的不可替代代币(ERC-721)智能合约,并将其部署到 Berachain 测试网上!

使用 Hardhat 成功部署合约的代码片段
使用 Hardhat 成功验证已部署合约的代码片段
本教程将主要涵盖合约的初始设置、创建和部署!
⚠️ 前置条件
在开始这个技术教程之前,请确保具备以下条件:
- 扎实的区块链基础知识和智能合约原理。
- 熟练掌握 Solidity,这是以太坊合约开发的主要语言。
- 计算机上已安装最新版本的 Node.js 和 npm,可以通过命令行使用
node -v进行验证。
步骤 1:初始化 Node.js 项目
首先,创建一个新的 Node.js 项目。这一步是基础,涉及设置一个专用的项目目录并使用 Node 的包管理工具进行初始化。
mkdir bera-hardhatTest && cd bera-hardhatTestnpm init -y
# Wrote to /Users/dethebera/BeraWork/hardhat-verification-bera/package.json:
# {
# "name": "hardhat-verification-bera",
# "version": "1.0.0",
# "description": "",
# "main": "index.js",
# "scripts": {
# "test": "echo \"Error: no test specified\" && exit 1"
# },
# "keywords": [],
# "author": "",
# "license": "ISC"
# }此命令序列将创建一个新目录,然后使用默认参数触发 Node.js 项目的初始化。
步骤 2:设置 Hardhat
在你的项目目录中安装 Hardhat 并初始化一个新的项目环境:
npm install --save-dev hardhat

# added 263 packages, and audited 264 packages in 31s

# 52 packages are looking for funding
#  run `npm fund` for details

# found 0 vulnerabilities
选择 TypeScript 作为你的项目语言,并按照设置提示进行操作,确保包含 .gitignore 文件和必要的依赖项。
注意:弃用警告
使用 npx hardhat 初始化项目已被弃用,未来将被移除。请使用 npx hardhat init 代替。
npx hardhat init
# 888 888 888 888 888
# 888 888 888 888 888
# 888 888 888 888 888
# 8888888888 8888b. 888d888 .d88888 88888b. 8888b. 888888
# 888 888 "88b 888P" d88" 888 888 "88b "88b 888
# 888 888 .d888888 888 888 888 888 888 .d888888 888
# 888 888 888 888 888 Y88b 888 888 888 888 888 Y88b.
# 888 888 "Y888888 888 "Y88888 888 888 "Y888888 "Y888
# 👷 Welcome to Hardhat v2.21.0 👷
# ✔ What do you want to do? · Create a TypeScript project
# ✔ Hardhat project root: · /Users/dethebera/BeraWork/hardhat-verification-bera
# ✔ Do you want to add a .gitignore? (Y/n) · y
# ✔ Do you want to install this sample project's dependencies with npm (@nomicfoundation/hardhat-toolbox)? (Y/n) · y
# npm install --save-dev "@nomicfoundation/hardhat-toolbox@^4.0.0"
# added 273 packages, and audited 537 packages in 40s
# 90 packages are looking for funding
# run `npm fund` for details
# found 0 vulnerabilities
# ✨ Project created ✨
# See the README.md file for some example tasks you can run
# Give Hardhat a star on Github if you're enjoying it! ⭐️✨
# https://github.com/NomicFoundation/hardhat在设置好 Hardhat 之后,使用以下命令验证其是否正常运行:
npx hardhat test

#Downloading compiler 0.8.24
# Compiled 1 Solidity file successfully (evm target: paris).


#   Lock
#     Deployment
#       ✔ Should set the right unlockTime (691ms)
#       ✔ Should set the right owner
#       ✔ Should receive and store the funds to lock
#       ✔ Should fail if the unlockTime is not in the future
#     Withdrawals
#       Validations
#         ✔ Should revert with the right error if called too soon
#         ✔ Should revert with the right error if called from another account
#         ✔ Shouldn't fail if the unlockTime has arrived and the owner calls it
#       Events
#         ✔ Should emit an event on withdrawals
#       Transfers
#         ✔ Should transfer the funds to the owner


#   9 passing (717ms)
步骤 3:深入 NFT 智能合约开发
现在,深入到项目的核心——NFT 智能合约。导航到 contracts 文件夹并开始编写你的 ERC-721 合约。在此阶段,你将编写实际代码,以定义 NFT 的特性和行为。
进入 contracts 文件夹并创建一个新文件 NFT.sol。
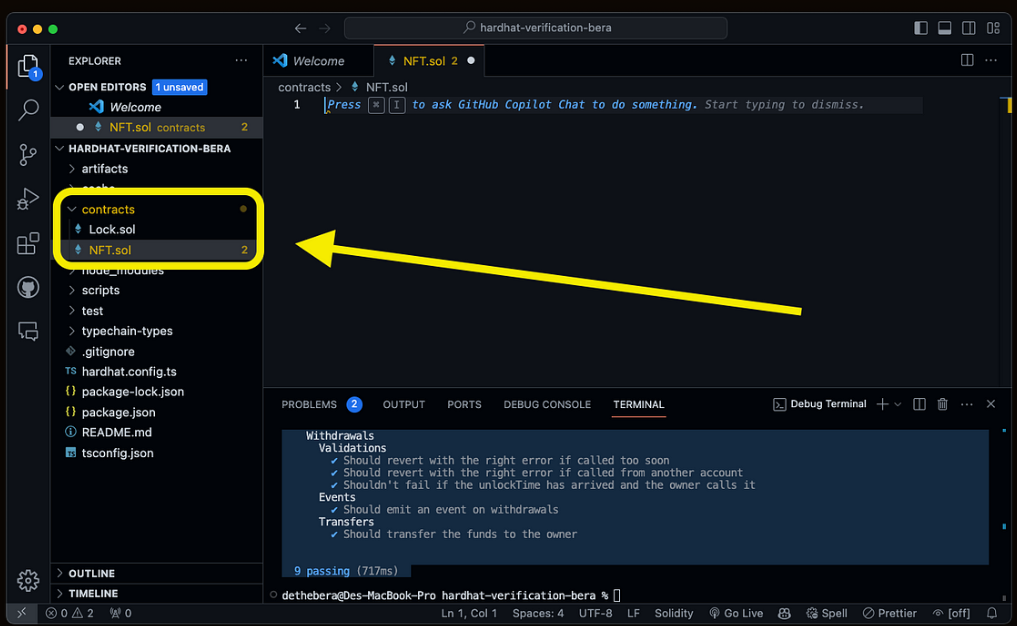
以下是使用 OpenZeppelin 安全且知名的库的基本模板:
File: ./contracts/NFT.sol
// SPDX-License-Identifier: MIT
pragma solidity ^0.8.23;

import "@openzeppelin/contracts/token/ERC721/ERC721.sol";

contract NFT is ERC721 {
    uint256 public currentTokenId;

    constructor() ERC721("NFT Name", "NFT") {}

    function mint(address recipient) public payable returns (uint256) {
        uint256 newItemId = ++currentTokenId;
        _safeMint(recipient, newItemId);
        return newItemId;
    }
}
OpenZeppelin 的合约是一个预编写的、安全代码片段的宝库。它们大大减少了开发时间并增强了智能合约的安全性。
npm install @openzeppelin/contracts

# added 1 package, and audited 539 packages in 2s

# 91 packages are looking for funding
#   run `npm fund` for details

# found 0 vulnerabilities
在你的 NFT.sol 文件中,确保 Solidity 版本与 hardhat.config.ts 中指定的版本一致。解释每个组件的用途,重点说明 OpenZeppelin 合约在你的 NFT 架构中所扮演的角色。
步骤 5:将 MetaMask 和 Berachain Artio 集成到 Hardhat
此步骤涉及将你的 MetaMask 钱包和 Berachain 测试网连接到 Hardhat 环境。这一连接对于在 Berachain Artio 上部署智能合约至关重要。
1.安装 dotenv:一个用于管理环境变量的工具。
npm install dotenv --save

# added 1 package, and audited 538 packages in 612ms

# 91 packages are looking for funding
#   run `npm fund` for details

# found 0 vulnerabilities
2.配置 .env 文件:将你的 MetaMask 私钥安全地存储在项目根目录中新建的 .env 文件中。
在项目根目录中创建 .env 文件,并添加你的 MetaMask 私钥。若需要从 MetaMask 导出私钥的帮助,请参考此指南。
你的 .env 文件应如下所示:
PRIV_KEY = 0x"your exported private key"步骤 6:配置 hardhat.config.js
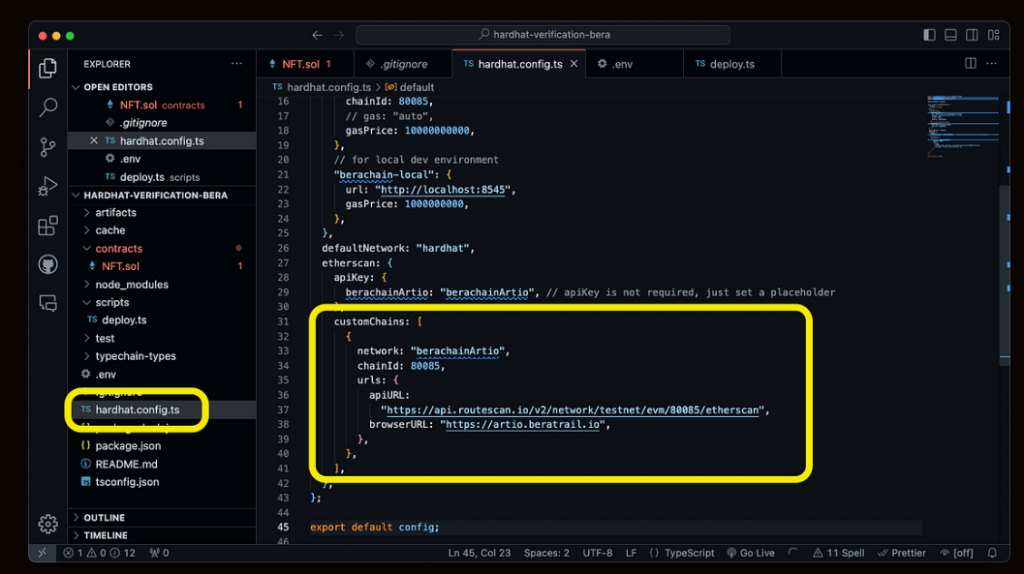
此步骤旨在微调你的 Hardhat 设置,使其与 Berachain 的规范保持一致。更新你的 hardhat.config.ts 文件,添加必要的依赖项和网络配置,特别要注意 Berachain Artio 的自定义链设置。
File: ./hardhat.config.ts
import { HardhatUserConfig } from "hardhat/config";
import "@nomicfoundation/hardhat-toolbox";
import "@nomicfoundation/hardhat-verify";

require("dotenv").config();

const config: HardhatUserConfig = {
  solidity: {
    version: "0.8.23",
  },
  networks: {
    // for testnet
    "berachain-artio": {
      url: "https://rpc.ankr.com/berachain_testnet",
      accounts: [process.env.WALLET_KEY as string],
      chainId: 80085,
      // gas: "auto",
      gasPrice: 10000000000,
    },
    // for local dev environment
    "berachain-local": {
      url: "http://localhost:8545",
      gasPrice: 1000000000,
    },
  },
  defaultNetwork: "hardhat",
  etherscan: {
    apiKey: {
      berachainArtio: "berachainArtio", // apiKey is not required, just set a placeholder
    },
    customChains: [
      {
        network: "berachainArtio",
        chainId: 80085,
        urls: {
          apiURL:
            "https://api.routescan.io/v2/network/testnet/evm/80085/etherscan",
          browserURL: "https://artio.beratrail.io",
        },
      },
    ],
  },
};

export default config;
步骤 7:创建部署脚本
在 scripts/ 目录中,编写部署脚本(更新 deploy.ts)。该脚本是将智能合约部署到区块链的蓝图。解释每行代码及其在利用 Hardhat 部署功能中的作用。
File: ./scripts/deploy.ts
import { setBlockGasLimit } from '@nomicfoundation/hardhat-toolbox/network-helpers';
import { ethers } from 'hardhat';

async function main() {
  const nft = await ethers.deployContract('NFT');

  await nft.waitForDeployment();

  console.log('NFT Contract Deployed at ' + nft.target);
}

// We recommend this pattern to be able to use async/await everywhere
// and properly handle errors.
main().catch((error) => {
  console.error(error);
  process.exitCode = 1;
});
步骤 8:实际部署
将你的合约部署到 Berachain Artio 上,执行以下命令:
npx hardhat run scripts/deploy.ts --network berachain-artio
# NFT Contract Deployed at 0xBC862C68CE9EE3aFa762DbF7A51712E3c6E79215
引导 reader 解析部署输出,并确认合约成功上线的步骤。

理解对 Hardhat 进行的整体更改
如果你已经理解了上述为适配 Berachain Artio 所做的部署脚本和 Hardhat 配置更改,则可以跳过本节。
默认的 Hardhat deployContract 存在一些问题,但手动构建部署交易并指定 gasLimit 和 gasPrice 可以在 Artio 上运行。必须删除 hardhat 配置文件中的 gas: "auto" 设置。设置为自动会增加部署时间并导致交易提交延迟。
手动构建交易并设置强制的 gas 限制(这可能会增加一定的 gas 费用,但不会显著增加)。
合约验证在 Berachain 上
验证是部署后的关键步骤,它将已部署的字节码与相应的源代码进行公开关联。该过程提高了区块链社区的透明度和信任度。
安装@nomicfoundation/hardhat-verify 插件,并指导用户完成验证过程,强调使用正确的合约地址的重要性。
安装
安装 hardhat-verify 插件,它将帮助直接通过 Hardhat 验证合约。
npm install --save-dev @nomicfoundation/hardhat-verify

# up to date, audited 539 packages in 3s

# 91 packages are looking for funding
#   run `npm fund` for details

# found 0 vulnerabilities
我们已经包含了以下用于 Routescan API 的代码,它有助于合约的验证。
欲了解更多信息,请访问 https://artio.beratrail.io/documentation/recipes/hardhat-verification。
验证
现在要验证合约,你只需要已部署合约的合约地址。
npx hardhat verify --network berachain-artio <0x...>确保替换整个 “<0xaddress>”。正确的示例如下:
✅ npx hardhat verify — network berachain-artio 0x3229075dd6F75bD879F7af07d384A0856c30a806
❌ npx hardhat verify — network berachain-artio <0x3229075dd6F75bD879F7af07d384A0856c30a806> (这是不正确的)
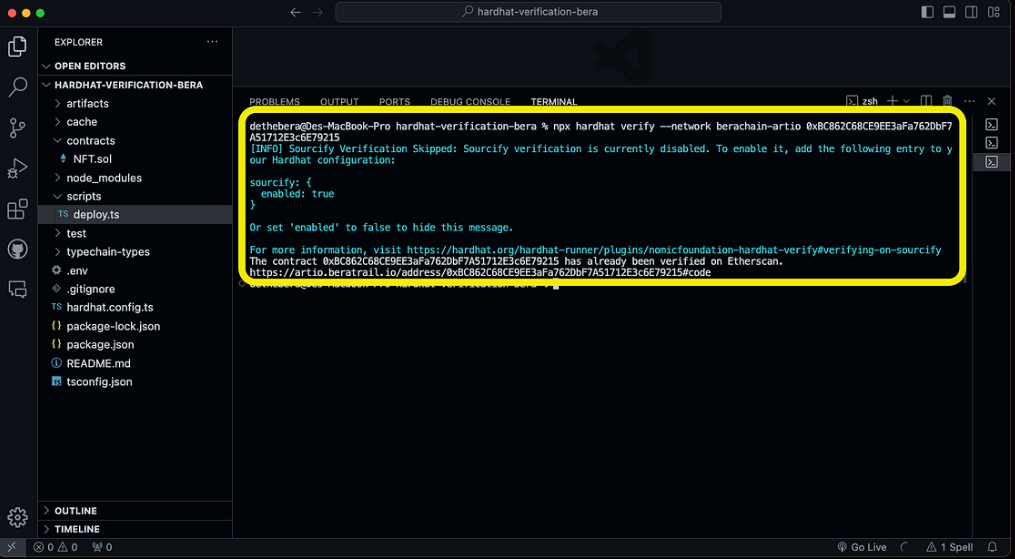
完成后,输出应类似如下。
# [INFO] Sourcify Verification Skipped: Sourcify verification is currently disabled. To enable it, add the following entry to your Hardhat configuration:
# sourcify: {
# enabled: true
# }
# Or set 'enabled' to false to hide this message.
# For more information, visit https://hardhat.org/hardhat-runner/plugins/nomicfoundation-hardhat-verify#verifying-on-sourcify
# The contract 0xBC862C68CE9EE3aFa762DbF7A51712E3c6E79215 has already been verified on Etherscan.
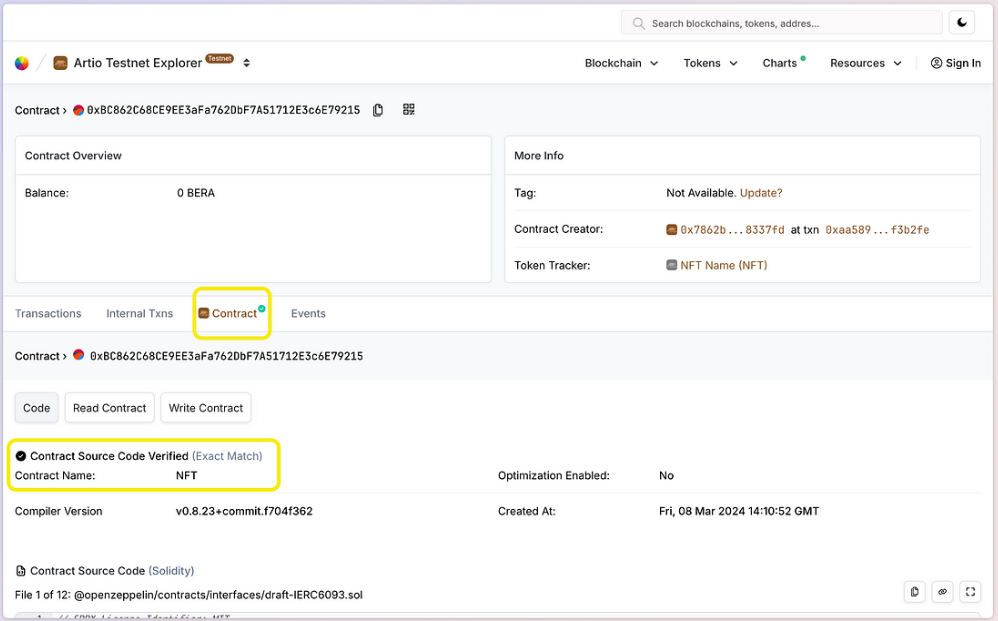
# https://artio.beratrail.io/address/0xBC862C68CE9EE3aFa762DbF7A51712E3c6E79215#code如果我们使用终端中提供的链接前往 Berachain Explorer(Beratrail),我们将能够看到合约的源代码已成功通过验证!
完整代码
File: ./contracts/NFT.sol
// SPDX-License-Identifier: MIT
pragma solidity ^0.8.23;

import "@openzeppelin/contracts/token/ERC721/ERC721.sol";
contract NFT is ERC721 {
    uint256 public currentTokenId;
    constructor() ERC721("NFT Name", "NFT") {}
    function mint(address recipient) public payable returns (uint256) {
        uint256 newItemId = ++currentTokenId;
        _safeMint(recipient, newItemId);
        return newItemId;
    }
}
File: ./scripts/deploy.ts
import { setBlockGasLimit } from '@nomicfoundation/hardhat-toolbox/network-helpers';
import { ethers } from 'hardhat';
async function main() {
  const nft = await ethers.deployContract('NFT');
  await nft.waitForDeployment();
  console.log('NFT Contract Deployed at ' + nft.target);
}
// We recommend this pattern to be able to use async/await everywhere
// and properly handle errors.
main().catch((error) => {
  console.error(error);
  process.exitCode = 1;
});
File: ./hardhat.config.ts
import { HardhatUserConfig } from "hardhat/config";
import "@nomicfoundation/hardhat-toolbox";
import "@nomicfoundation/hardhat-verify";
require("dotenv").config();
const config: HardhatUserConfig = {
  solidity: {
    version: "0.8.23",
  },
  networks: {
    // for testnet
    "berachain-artio": {
      url: "https://rpc.ankr.com/berachain_testnet",
      accounts: [process.env.WALLET_KEY as string],
      chainId: 80085,
      // gas: "auto",
      gasPrice: 10000000000,
    },
    // for local dev environment
    "berachain-local": {
      url: "http://localhost:8545",
      gasPrice: 1000000000,
    },
  },
  defaultNetwork: "hardhat",
  etherscan: {
    apiKey: {
      berachainArtio: "berachainArtio", // apiKey is not required, just set a placeholder
    },
    customChains: [
      {
        network: "berachainArtio",
        chainId: 80085,
        urls: {
          apiURL:
            "https://api.routescan.io/v2/network/testnet/evm/80085/etherscan",
          browserURL: "https://artio.beratrail.io",
        },
      },
    ],
  },
};
export default config;
你也可以通过以下链接在我们的官方 Github 仓库中获取完整代码。
https://github.com/berachain/guides/tree/main/apps/hardhat-contract-verification
总结
本指南旨在成为一个全面的资源,指导读者完成在 Berachain Artio 上部署 ERC-721 NFT 的每一步,特别是合约验证。我们涵盖了使用 Hardhat 部署的基础知识,以及智能合约开发和验证所需的一些细节和定制化内容。
想要开始构建并获取支持?
学习资源:通过我们的文档 https://docs.berachain.com/developers 探索当前可用的更多指南。
https://docs.berachain.com/developers
Discord 社区:加入 Third Web 的 Discord 社区,获取更多帮助、参与讨论,并随时了解 Web3 的最新进展。
⚠️ 仍然遇到问题或有疑问?
前往 Discord,提交工单!
我们的开发者关系团队将很乐意为您提供帮助! 🤝
❤️ 别忘了为这篇文章点赞 👏🏼
原创文章,作者:Monica,如若转载,请注明出处:https://www.dappchaser.com/how-to-deploy-and-verify-contracts-on-berachain-de-the-bera/